I am always buying bananas. I also forget that I have them so they usually end up getting too ripe, and I will just throw them out. I do have a perfect use for those bananas with the unsightly brown spots all over them. Make banana bread! I made some a few weeks ago, and my daughter couldn't stop eating it. That's a good sign. I love this bread. It's perfect for breakfast. Or lunch, or an afternoon snack...I could go on and on. You get the idea.
Banana Bread
1 1/4 c sugar
1/4 c butter - softened
3 egg whites
1 t vanilla
1 1/2 c mashed ripe bananas (about 3-4 bananas)
1 small container fat free vanilla yogurt
2 3/4 c flour
1 1/4 t baking soda
1 t salt
1 t cinnamon
1/2 c chopped nuts - optional
Cream together the sugar and butter. Stir in the egg whites until blended. Add banana, yogurt, and vanilla and beat until smooth. Stir in remaining ingredients until just moistened. Don't over stir. Pour into two greased 8 inch loaf pans. bake for 50-60 minutes at 350.
Thursday, December 17, 2009
Wednesday, December 16, 2009
Some Alfredo Love...
This has got to be one of my all time favorite meals. I love Alfredo sauce. I could just eat it with a spoon right from the saucepan. Or I could be more civilized and pour some into a bowl and dip garlic bread into it. I may or may not have done this a time or two. My husband might be just as guilty of it as I am. It's a great midnight snack! Who could resist something that has both butter and cheese in it?
Alfredo Sauce
8 oz. package cream cheese
3/4 c grated Parmesan cheese
1/2 c milk
1/2 c butter
pepper - to taste
Combine all ingredients in a saucepan. Cook over medium heat, stirring frequently until you have a smooth sauce. Serve over any type of pasta you like. I usually toss some chicken and spinach into my bowl. It's that easy!

Tuesday, December 15, 2009
Mmmmmm... molasses cookies!

Yes...it's been quite some time since I've been to the land of blogging. That doesn't mean I haven't been cooking, though. I have just been too busy to sit down and think of something witty to say and then type it all out. I did manage to make it through Thanksgiving without burning or under cooking anything! I also made my first turkey. I am not a fan of turkey, but after this one, I can't wait to make one for Christmas. I've been baking a lot of cookies lately. The kids are quite happy about that. They tend to prefer the cookie dough to the cookies. One of my all time favorites is molasses cookies. I don't know why I only make them this time of year, but it might also be a good thing that I only make them around the holidays. Whenever I make this recipe, I usually double it. These also freeze well!
Molasses Cookies
3/4 c shortening
1 c sugar
1/4 c Molasses
1 egg
2 c flour
2 t baking soda
1/2 t ground cloves
1/2 t ground ginger
1 t cinnamon
1/2 t salt
Melt shortening in a saucepan, then set aside to cool. Mix sugar, molasses, egg, and shortening together. Sift together flour, baking soda, cloves, ginger, cinnamon, and salt. Add this to the sugar and molasses mixture. Mix well. Chill for an hour. Roll into 1 inch balls, then roll in granulated sugar. Place on greased cookie sheet. Bake for 8-10 minutes at 375.
Monday, November 2, 2009
Buffalo Chicken Stuff

I love buffalo wings. When I was pregnant with my son, who is now 7, I couldn't get enough of them. To this day I am still a fan. My husband, however, is not a huge fan. He can take 'em or leave 'em. Imagine my surprise one day last week when he said he had seen a recipe for some buffalo chicken wraps and asked if maybe I would make some buffalo chicken strips. Ummmm...have you not realized my love for buffalo wings, especially when doused in a healthy serving of Ranch dressing? It's just the bones I don't like. At all. So I decided that I would come up with my own concoction. We had some friends coming over, so I figured I'd just test it out on them. My back up plan was ordering pizza, just in case there was a disaster in the kitchen. Unfortunately the pizza delivery guy didn't get our business that night. My husband and his friend inhaled their chicken. They didn't cut it into tiny little bites to savor the flavor. I had taken maybe three bites, and they were helping themselves to another serving. When my husband asked me last night to make that "Buffalo Chicken Stuff" again, and sooner than later, I realized it was a success.
Buffalo Chicken Stuff
4 chicken breasts, pounded thin
2 sticks butter
Louisiana hot sauce, or whatever brand you prefer
2 cups plain bread crumbs
1 package Ranch dressing mix
2 cups Mozzarella cheese, shredded - provolone will also work
Melt one stick of butter and mix in 4 tablespoons of hot sauce. You can use more if you like a little more kick. In a large ziploc baggie add the chicken and the butter mixture, coating the chicken. Throw it in the fridge to marinate for an hour or so. Melt the other stick of butter adding several tablespoons of the hot sauce. Place this in a shallow bowl. In another bowl, mix the bread crumbs with the Ranch dressing mix. Grease an 8x8 baking dish. Get out your marinated chicken breasts and prepare to get messy! Place one chicken breast on a plate and add 1/4 cup of the cheese on top of the chicken. Roll up the chicken, then roll the chicken around in the melted butter. Next, coat the chicken with breadcrumbs. Place the chicken seam side down in the baking dish. Repeat with the remaining chicken breasts. Drizzle the rest of the butter over the chicken. Bake at 350 for 35-40 minutes. Take out of the oven, top with the rest of the cheese, and bake another 5 minutes, or until the cheese is melted. Enjoy!
Tuesday, October 27, 2009
Cookie Cutters

I love cookie cutters. Especially the holiday ones. My collection isn't quite what I believe it should be, so I need to work on that. Ssshhhh...don't tell my husband! You can't have a holiday without making iced sugar cookies. Or at least that is what I think, and my kids feel the same way. Yesterday while I the kids were at school I made sugar cookies. And I iced them. By myself. I didn't just make the dough and let it chill until the kids got home so they could help. I didn't just bake the cookies and let them cool until the kids got home so they could ice them. I made the dough, baked the cookies, and iced them, all before the youngest kid got home from school. Now if you know anything about my kids, they love to ice cookies. They get pretty creative, and I will just leave it at that. I greeted them with "Mommy made sugar cookies today!" when they got home, wincing because I knew they were going to ask to ice them. To my shock, they were happy because they didn't have to wait for the icing to set for once. They just dove right in and promptly ate about half the cookies. I guess I'll be making them again later this week.
Sugar Cookies
1 c butter, softened
1 c sugar
1 egg
3 T milk
1 t vanilla
3 c flour
1 1/2 t baking powder
1/2 t salt
Cream the butter, sugar, and egg. Mix in the milk and vanilla. Sift together the flour, baking powder, and salt. Add this to the wet ingredients. Mix well, and chill for one hour. Roll out dough and cut out with your favorite cookie cutters. Bake at 400 for 5-8 minutes. This makes about 30 cookies, if your kids don't eat all the dough. What I really like about these sugar cookies is that they aren't overly sweet. That is what the icing is for!
Sugar Cookie Icing
1 c powdered sugar
2 t light corn syrup
1 T milk
1/4 t almond extract
assorted food coloring
Stir together the powdered sugar and milk until smooth. Add the corn syrup and almond extract, stirring until icing is smooth and glossy. Add a bit more corn syrup if needed to thin it out. Divide into separate bowl and add food coloring. Dip the cookies, or paint on icing with a brush. Let the icing set for about an hour.
Friday, October 23, 2009
Soup...
I love making soup. When it starts getting cool outside I immediately dig out my stack of soup recipes and start planning. Today was a soup kind of day. Several years ago when I first told my husband about this soup he was skeptical. There was no meat in it. So, at his suggestion, I added some chicken. Score! Ever since then I don't make it without chicken. Of course, being the bread lover that I am, I had to have bread with my soup. I could give up sweets before I would ever give up bread. I would never survive on a low carb diet! Dinner tonight was Santa Fe Squash soup and some crusty French bread. Yum!

Santa Fe Squash Soup
1 T olive oil
1/4 c chopped onion
1 can chicken broth
1 c milk
1 c sliced yellow squash
1 c sliced zucchini
1 c frozen corn
1 4 oz can diced green chiles
1/2 c Monterrey Jack cheese
1-2 cooked and shredded chicken breasts
In a large saucepan heat the oil over medium heat and cook the onion until soft. Add chicken broth, squash. zucchini, corn, and chiles. Bring to a boil. Cover, reduce heat, and cook until squash is tender. This takes about 15 minutes. Add milk, cheese, and chicken. Cook until heated through. I usually double this recipe. Top with more cheese and sliced avocado if you desire.

French Bread
1 1/4 c warm water
2 t sugar
1 t salt
3 1/2 c bread flour
1 package yeast
1 t olive oil
1 egg
1 T water
I used a bread machine today to mix this, but you can do it by hand, or use a stand mixer. Add the flour, sugar, salt, and yeast to the bread machine. Next, add the water and olive oil. Set the bread machine to the dough cycle. If mixing by hand, dissolve the yeast in the water. Stir in the olive oil. Add the remainder of the ingredients, mixing and kneading well. Form into a ball and let rise about an hour. Divide the dough into two equal parts. Form into two loaves. Place on a baking sheet that has been sprinkled with flour. Cover and let rise until doubled in size. Preheat oven to 375. Beat the egg and water together. Brush over the top of each loaf. With a sharp knife, cut three diagonal slits on the top of each loaf. Sprinkle with garlic salt. Bake for 25 minutes, or until golden brown. Try not to eat the bread all in one sitting!
Santa Fe Squash Soup
1 T olive oil
1/4 c chopped onion
1 can chicken broth
1 c milk
1 c sliced yellow squash
1 c sliced zucchini
1 c frozen corn
1 4 oz can diced green chiles
1/2 c Monterrey Jack cheese
1-2 cooked and shredded chicken breasts
In a large saucepan heat the oil over medium heat and cook the onion until soft. Add chicken broth, squash. zucchini, corn, and chiles. Bring to a boil. Cover, reduce heat, and cook until squash is tender. This takes about 15 minutes. Add milk, cheese, and chicken. Cook until heated through. I usually double this recipe. Top with more cheese and sliced avocado if you desire.
French Bread
1 1/4 c warm water
2 t sugar
1 t salt
3 1/2 c bread flour
1 package yeast
1 t olive oil
1 egg
1 T water
I used a bread machine today to mix this, but you can do it by hand, or use a stand mixer. Add the flour, sugar, salt, and yeast to the bread machine. Next, add the water and olive oil. Set the bread machine to the dough cycle. If mixing by hand, dissolve the yeast in the water. Stir in the olive oil. Add the remainder of the ingredients, mixing and kneading well. Form into a ball and let rise about an hour. Divide the dough into two equal parts. Form into two loaves. Place on a baking sheet that has been sprinkled with flour. Cover and let rise until doubled in size. Preheat oven to 375. Beat the egg and water together. Brush over the top of each loaf. With a sharp knife, cut three diagonal slits on the top of each loaf. Sprinkle with garlic salt. Bake for 25 minutes, or until golden brown. Try not to eat the bread all in one sitting!
Thursday, October 22, 2009
Breakfast...it's what's for dinner...if the kids are lucky

Remember those times as a kid when you were lucky enough to get breakfast for dinner? You only thought you were getting a real treat. Now that I am the mom, my kids get breakfast for dinner when I forget to thaw something out. Or I am just feeling really lazy. Either way, my kids are always happy when I suggest pancakes. They are happy to eat them in the morning, but are really happy to eat them for dinner. Any time I suggest pancakes, they ask me if it is going to be pancakes out of a box or "my" pancakes. That is the deciding factor for them. That and if they get to have chocolate chips or sprinkles in them. They drive a hard bargain. I made these pancakes so many times this past summer when my daughter was going to soccer camp. We had another soccer player staying with us for most of the week, and every morning they would inhale an entire batch of pancakes leaving nothing but the crumbs and dirty dishes in the sink. So I say "Go for it!". Have some pancakes for dinner and pretend that you are a kid again.
Buttermilk Pancakes
1 c flour
1 t sugar
1 t baking powder
1/2 t baking soda
1/4 t salt
1 c buttermilk
2 1/2 T milk
1 egg
1 1/2 T butter, melted and cooled
In a large bowl, combine the dry ingredients. I like to sift all mine together. In a separate bowl, mix together the buttermilk, egg, milk, and melted butter. Add the wet ingredients to the dry and mix together until just blended. It should be somewhat lumpy. You can also add chocolate chips or colored sprinkles if you want. I like to add frozen blueberries to mine. Lightly oil a griddle and heat over medium heat. Pour 1/4 - 1/2 cup batter into pan and cook on both sides until lightly browned.
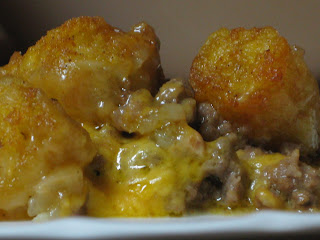
It's not exactly gourmet...
Comfort food. It's not exactly gourmet, but sometimes we just need a little comfort in our food. To me, comfort food needs cheese. This evening I retired to my kitchen and whipped up a batch of Tater Tot Casserole. I guess I could give it some fancy name, but this dish is anything but fancy. Which translates into "the kids will eat it". My husband will eat it. I will eat it. Looks like we have a winner! My husband saw me taking pictures and couldn't wait for me to finish. He knew that meant he just got to eat as soon as I was done.
Tater Tot Casserole
1 1/2 lbs lean ground beef or turkey
1 can cream of chicken soup
Chopped onion - as much or little as you like
Chopped green bell pepper - as much or as little as you like
2 cups grated cheddar cheese
1/2 bag frozen tater tots
Seasoning salt
Preheat oven to 375. In a pan on the stove, add the meat, onion, and bell pepper. Season with salt and pepper. Cook until done. Drain any grease from the meat. Mix the beef or turkey with the cream of chicken soup in a medium sized bowl. You can also add any veggies you want to this mixture. I threw in some grated cheese just because I'm such a fan of cheese. Pour this into a 8x8 casserole dish. Top the meat with the grated cheese, then add a layer of tater tots. Sprinkle seasoning salt on top of the tots. Bake for 35- 40 minutes. Enjoy!
Wednesday, October 21, 2009
When I want it, I make it...

I've been wanting chicken enchilada soup from Chili's. My husband didn't feel the need to take me there just to get a bowl of soup. "You know how to cook. Why don't you just make it yourself?" were his words. I informed him that it would involve a trip to the grocery store, hoping that would sway him, but that didn't seem to work. If you know my husband, he rolls his eyes every time I even mention needing to run to the H.E.B. to get "a few things". Off I went, list in hand, to the grocery store. What resulted was a soup that I loved. No more trips to a restaurant just to get soup. I can make it right at home, and I don't have to put on make-up or straighten my hair! Perfect, if you ask me. I threw all the ingredients into my crock pot this morning, and by late afternoon the house smelled fabulous. It was also super easy. Even a guy could make it.
Chicken Enchilada Soup
1 can black beans, drained and rinsed
1 can corn, drained
1 can diced tomatoes - use Ro-tel if you want some more spice
1/4 cup chopped onion
1 can enchilada sauce (10 oz), or 2 cups of the semi homemade, which follows
1 can cream of chicken soup
3/4 c milk
2 chicken breasts
2 t ground cumin
In a crock pot mix together the black beans, corn, diced tomatoes, and onion. In a medium sized bowl mix together the enchilada sauce, cream of chicken soup, and milk. I used enchilada sauce that I had made and frozen previously. Place chicken breasts on top of the mixture in the crock pot. Sprinkle cumin over the chicken. Pour the sauce over chicken and cook on low for 6-7 hours. Remove chicken, shred it, and add back to the soup, stirring to mix. Top with shredded cheese of your choice. You could also add chopped avocado or tortilla strips.
Enchilada sauce
This is the Pioneer Woman's version, I just changed it a little.
1 T vegetable oil
1 T flour
1 large can enchilada sauce
1 can chicken broth
dash of salt
dash of pepper
In a large saucepan, whisk together oil and flour to form a paste. Cook over medium for 1 minute. Add the remaining ingredients, stirring well. Bring to a boil, reduce heat and simmer for 30 minutes. This freezes really well.
Who doesn't love pizza?

Pizza. It's one of my favorite foods. I like to experiment with different toppings, but it always has to have tons of cheese. I love cheese. And you just can't beat cold pizza for breakfast. I hadn't made pizza in a while, so the other day I decided it had been too long, so out came the ingredients. I also made my own sauce this time. My son hates pizza sauce, and even he told me it was good! Guess I'll be making my own from now on. It was really easy, so I can't complain. I used to use my bread maker to make the dough, but I use the Kitchen Aid mixer with the dough hook now. I suppose you could do it the old school way with your hands, but I am just too in love with my stand mixer. Hope you enjoy the pizza as much as we do!
Pizza Crust
1 pkg yeast
1/2 t brown sugar
1 1/2 c warm water
1 t salt
2 T olive oil
3 1/3 c flour
Garlic salt - to taste
Dissolve yeast and brown sugar in water and let sit for 10 minutes. Stir in the salt and olive oil. You can also add some garlic salt or any other Italian seasonings if you'd like. I usually add several shakes of garlic salt. It adds a nice flavor. Mix in 2 1/2 cups of the flour. Continue adding the remainder of the flour until the dough is no longer sticky. Place into an oiled bowl, cover and let rise until doubled in size. This takes 1-2 hours. Punch down dough and form into a tight ball. Let the dough chill out and relax a minute. Roll out and let crust rise 15 minutes before baking.
Pizza Sauce
1 6 oz can tomato paste
1 c chicken broth (you can use water)
1/4 c olive oil
1/2 T dried oregano
1/2 T dried basil
2 cloves minced garlic
1 t sugar
Mix all the ingredients together, and you've got your pizza sauce. I made mine when I started the dough and just stuck it in the fridge until I was ready to use it. It makes enough for 2-3 pizzas.
To make the pizza, preheat the oven to 425. Bake the crust for 5 minutes before adding the toppings. Spread the pizza sauce on and add any toppings you want. Bake for 15 minutes, or until cheese is bubbly. I use a pizza stone. Which reminds me...I need to get another one.
Sunday, October 18, 2009
Black Bean Soup... Tasty!
It was cool out the other day. Quite a change from the 90 degrees we'd been experiencing. I thought it was fall?!?!? I guess Texas had other ideas. I was wanting some soup, but didn't really feel like going to the grocery store. My husband was really happy about that. I looked in the pantry and there were some black beans. Now, I am a big fan of black beans, but have never made black bean soup. I figured "no time like the present", so I gathered up the ingredients and off I went. Not that I had to go far... about 2 feet to my kitchen counter. I had searched the internet for recipes, and found several that looked good. Of course I just combined what I liked from each one and made my own. I was very happy with how it turned out. Even my husband ate some, and he is the type that thinks you should have some sort of meat at each meal. Honey, there was no meat in this, and you ate it anyways. I love my husband.
Black Bean Soup
3 cans of black beans
1 can Ro-tel
1 can chicken broth
Chopped onion - I used about 1/2 c, but you can use more or less
Minced garlic - to taste
Chili powder - to taste
Ground cumin - to taste
Splash of lime juice (optional)
1/2 - 3/4 c half and half
1 1/2 c shredded cheddar cheese
2 T flour
I used my crockpot for this because it had been feeling a little left out lately. Drain and rinse the black beans. In the crockpot add the black beans, can of Ro-tel, chicken broth, onion, and garlic. Stir and add a few shakes of ground cumin, chili powder, and a splash of lime juice. I just love lime juice, and think it adds a nice touch. If you like your food on the spicy side, throw in a few slices of jalapeno. Cook on low for 2 hours. When the 2 hours are up, puree the soup in small batches with the half and half. I used my food processor, but a blender will do the job. You could also use an immersion blender. I don't have one, but if my husband is reading this, maybe I will have one soon. Hint, hint. Return the soup to the crockpot. In a bowl mix the cheese with the flour. Add this to the soup, stir well, and heat through. Top the soup with sour cream, slices of avocado, tortilla chips, salsa, whatever strikes your fancy. You could also eat it plain, but there's no fun in that!

Friday, October 16, 2009
Baby apple pies
I love food that is bite sized and cute. If it's bite sized, then it doesn't have as many calories, right? Even if you eat a plate full of those little bite sized goodies. I like to think that way at least. I was bored today, so I did what I usually do when I am bored. I bake. If I am not baking, then I am scouring the internet for my next new recipe. The kids wanted something sweet, but I didn't feel like going to the store. I would have made cookies, but I was out of eggs. I ended up making these adorable little baby apple pies. They remind me of those fried pies I used to eat when I was younger and not worried about calories. Now, these little suckers aren't exactly diet food, but they aren't quite as bad as the goodness that I knew as fried pies. Well, unless you happen to eat all of them in one sitting. These are really easy to make, which is always a plus!

Baby Apple Pies
1 can refrigerated biscuit dough
1/4 c sugar
1 T cinnamon
2 apples (any kind) peeled and cut into small pieces
2 T butter, melted
1/2 c powdered sugar
1-2 T milk
Preheat the oven to 375. Mix the sugar and cinnamon together. Roll out each biscuit to about 4 inches in diameter. In the middle of the biscuit place about 1T of apple and sprinkle with some of the cinnamon sugar mixture. Drizzle a bit of the melted butter on top. Fold over the dough and crimp the edges with a fork to seal. Place on a greased cookie sheet and bake for 12-15 minutes. While the pies are baking, mix together the powdered sugar and milk until smooth, adding a bit more milk if necessary. After removing the pies from the oven, drizzle the glaze over them while they aer still warm. Enjoy! You might even share them if you have enough restraint.
Monday, September 28, 2009
Crock Pot Love
Do you ever have those days where you forget to thaw out something for dinner? Or you realize that you really need to make a trip to the grocery store because the only food you have is ramen noodles, Pringles, and Sponge Bob fruit chews. Today was one of those days. As I was frantically digging through the pantry looking for something to make for dinner, I realized that I have been neglecting my crock pot. Next to my Kitchen Aid mixer the crock pot is something I could not live without. This is one of the easiest recipes to make, and it is also pretty healthy. it is so easy to make, even a man who is clueless in the kitchen could make it.
Crock Pot Southwestern Chicken
4 Frozen chicken breasts (you read that right - FROZEN!)
2 Cans corn, drained
2 Cans black beans, drained and rinsed
1 Jar of salsa (it's better if you make your own, though)
In a crock pot add one can of corn, one can of black beans, and half the salsa. No need to mix it together. Place the frozen chicken breasts on top. Top the chicken with the remaining corn, black beans, and salsa. Cook on low for 6 hours. Top with shredded cheese and sour cream.
*You could leave the salsa out and add green chiles. You could also throw in some chopped onion and jalapenos.
Sunday, September 27, 2009
Biscuits, oh how I love thee...
I love biscuits. Especially the ones of the buttermilk variety. And they have to be made from scratch. Whenever I make these, they disappear almost as fast as they come out of the oven. I made some yesterday morning and the kids ate them so fast my head was spinning. Recon, the dog, even had two of them. That was probably courtesy of the seven year old.
Buttermilk Biscuits
3 c flour
2 Tbs sugar
1/2 tsp salt
1/2 c Crisco (I like the Crisco sticks, so much easier to measure)
2 1/2 t baking powder
1/2 t baking soda
1 c buttermilk
melted butter
Combine the flour, salt, sugar, baking soda, and baking powder. Cut in the Crisco until it looks like cornmeal. Add the buttermilk, stirring until mixed. I use my Kitchen Aid stand mixer for this part. Make sure you use the dough hook. Knead 2-3 times. Roll out to 1/2 inch thick and cut out. This makes about 14 biscuits. Now, this is the really important part. Using your thumb, make an indention on top of each biscuit and brush with the melted butter. Bake at 450 for 14-16 minutes. I usually brush the tops with more melted butter as soon as they come out of the oven. Yum!

I'm back!
I admit it has been a while since I've blogged. That doesn't mean that I haven't been cooking. It just means that life happens. Especially life with two kids. Having a daughter on a select soccer team takes up a lot of time. It seems as if we are always at practice or heading to a game. Then the flu hit our house, and my son was down for the count for several days. For once, I have a few moments without some kind of crisis, so I'm going to share a few recipes. There are no pictures...yet...but I'll get some on here soon. I'm still learning how to take pictures of food. With a chocolate lab in the house it's just a tad more difficult to get the picture before the dog gets to the plate. I did find out recently that the dog is quite fond of tortilla pie. My husband and I weren't to happy with the dog's desire to gobble up OUR dinner.
I thought that I would share a few appetizer recipes with you today. Where would we be without appetizers? It would be a sad, sad world.
Spicy Pretzels
1 large bag pretzel sticks
1/2 cup vegetable oil
1 package Ranch dressing mix
1 tsp cayenne pepper (more or less depending how spicy you like stuff)
1/2 tsp onion powder
1 tsp garlic powder
Here's the hard part. Find a large bowl with a lid. Trust me on this. You do not want to use a large ziploc baggie. It results in a huge mess. In the bowl add the pretzels and the oil. Add the remaining ingredients. Cover and shake until the pretzels are coated. Store in an airtight container. Take note...do not eat these and rub your eyes. It hurts. A lot.
Olive Balls
Green olives - drained on paper towels
1 1/4 cup flour
6 oz. sharp cheddar cheese - grated
1 stick of butter - room temperature
Dash of garlic salt
Dash of cayenne pepper
Mix flour with a dash of garlic salt and cayenne pepper. Mix in the cheese and butter. It works best if you use your hands. Form into balls around the olives. Bake at 400 for 10-12 minutes. I used to hate green olives, but I would inhale them when made like this. It's easy, and yummy. I think I need to go to HEB so I can make some.
Monday, September 7, 2009
For my husband...

My husband asks me to make calzones all the time. He thinks I should make them on a daily basis, but I don't. There are too many other good things to make, but this happens to be one of his favorites. When we lived in San Antonio, there was a little pizza place right around the corner from us, and they delivered. I think it is a bad thing that they knew me by name as soon as they heard my voice on the phone. I decided that I should probably just learn to make my own calzones. I think I succeeded. The good thing is, you can stuff with them with whatever you like. This recipe makes two really big ones, but you can also make four smaller ones if the kids are picky (like mine). When making the dough I have been using my Kitchen aid stand mixer, but you can also use a bread machine and just set it to the dough cycle.
Calzones - Jenn's version
Dough:
1 Package yeast
1 C warm water
1 T olive oil
1 t sugar
1 t salt
2 1/2 C flour
Dissolve the yeast and sugar in water and let sit for ten minutes, or until slightly foamy. Stir in olive oil, salt, and 1 cup of flour. Knead in the rest of the flour, or let your stand mixer do the job for you. Knead until no longer sticky. You may need to add a little extra flour. Place in oiled bowl and cover. let rise until doubled in size (usually about 1 1/2 hours). Divide dough in half, or into fourths, and roll out. Place toppings on half of the dough and fold over, sealing the edges. Bake at 375 for 30 minutes. I use a pizza stone, and if you don't have one, I highly recommend getting one.
Toppings:
Use whatever you like. I always use sauce and about 1/3 cup of Ricotta cheese along with a ton of mozzarella. Spinach, Canadian bacon, and mushrooms is really yummy. My husband likes Italian sausage, Canadian bacon, and green olives. Let your imagination go wild. Just enjoy it!
Use whatever you like. I always use sauce and about 1/3 cup of Ricotta cheese along with a ton of mozzarella. Spinach, Canadian bacon, and mushrooms is really yummy. My husband likes Italian sausage, Canadian bacon, and green olives. Let your imagination go wild. Just enjoy it!
Wednesday, September 2, 2009
Queso...enough said

I love queso. Who doesn't love that ooey goodness that is melted Velveeta cheese with Ro-tel dumped in it? I, however, have a version that kicks it up a notch. This recipe came from an uncle, but like every other recipe that lands in my hands, I tweaked it a bit. This past June, my husband and I spent a weekend at the Frio river with a group of our friends. I took my salsa and this queso. When the queso was heated up I saw grown women swat away the hands of any man who even glanced at the bowl of goodness that is queso. I might have been one of those women. I will never make queso using only Velveeta and Ro-tel again.
Roasted Tomato Queso
Ingredients:
5-6 Roma tomatoes, thinly sliced
5-6 Roma tomatoes, thinly sliced
1 16 oz block of Velveeta cheese
Minced garlic (as much or as little as you like)
Chopped red, yellow, and green bell peppers (again, as much or as little as you like)
Liquid smoke
Olive oil
Salt
Pepper
Place the sliced tomatoes on a baking sheet, not overlapping. Brush with olive oil and sprinkle with salt and pepper. I also like to use a little garlic salt. Broil in the oven until they start to shrivel, but don't let them burn. You can also roast them on a BBQ pit, which I do sometimes. Melt the Velveeta in a saucepan, thinning with milk if necessary. In a food processor or blender add the melted Velveeta, tomatoes, peppers, minced garlic, and 3-5 drops of liquid smoke. Give it a whirl until nicely blended. There you have it!
Serve with tortilla chips, top fajitas with it, eat it out of a bowl with a spoon. Just enjoy it. I know my husband does!
Wednesday, August 26, 2009
Bread...


I love bread. I could give up sweet before I gave up bread. I would never survive on the Atkins diet. The smell of fresh baked bread is one of my favorite smells. I think Scentsy should come up with that for one of their new scents. Just an idea. I felt like baking today, and as soon as my husband saw me pulling ingredients out of the pantry he didn't say a word...just rolled his eyes. There seems to be a lot of eye rolling in this household. I am a big fan of http://www.thepioneerwoman.com/ and also http://www.tastykitchen.com/. I found these rolls on the site, and just had to make them for myself. I changed a few things, just because that is what I do, and they turned out so good. It makes a ton of them, so there will at least be a few left for dinner tonight. I even took some pictures of them! Now, if you have a Kitchenaid mixer, use it. I usually use my bread machine, but I hadn't tried out the dough hook yet, and this was the perfect opportunity.
Oh So Yummy Crescent Rolls
Ingredients:
1 Cup water
1/2 Cup + 1 tsp sugar
2 Sticks of butter (Use the fake stuff if you must, but the REAL butter is just so much better)
1 Package yeast
3 Eggs
5 Cups bread flour
1 tsp salt
Dissolve the packet of yeast and 1 tsp sugar in 1/2 cup of warm water. Let sit for 10 minutes, until nice and foamy. In a small saucepan, dissolve 1/2 cup sugar in 1/2 cup water. Take off heat and slice up a stick of butter and drop in, allowing the butter to melt. Let cool a little. Beat 3 eggs, and mix in the butter mixture. Add the yeast to this and mix. Add 4 1/2 cups of the bread flour. This is where my Kitchenaid came in very handy. Mix well, but the mixture will be very sticky! Scrape the dough into a bowl that has been buttered. Turn over once so the dough is buttered on both sides. Cover with a cloth and let rise until doubled in size (1 1/2 - 2 hours).
Soften the second stick of butter, and butter your hands! Place dough on a lightly floured surface (this is where you use the rest of the flour) and knead 10-15 times. Divide dough into thirds, and work with 1/3 at a time. Melt some butter and brush it on a cookie sheet. Take 1/3 of the dough and roll out into a 12 inch circle. Rub the stick of soft butter over the dough, coating lightly. Using a pizza cutter, slice the dough like you are slicing a pizza into 12 slices. I did slice one into 8 slices, and the rolls turned out HUGE! Start at the wide end and roll towards the point. Place on the cookie sheet point side down and shape into a crescent, imagine that! Continue until all the dough is used. I had to use two cookie sheets. Melt the remaining butter and brush over the tops of the rolls. Stick the cookie sheets in the oven and let rise until almost double in size. Don't turn the oven on for this part. I just let things rise in the oven so my chocolate lab doesn't eat the dough!
Bake at 350 for 17-20 minutes.
As I type this, my husband and kids are eating the rolls. I'm going to be very upset if they don't save me one or ten.
Saturday, August 22, 2009
Oh, Yum!
I rarely make the same dish twice in one week. That's just not how I roll. I happened to find a recipe for this stuff called "Tortilla Pie" on the internet this week. It looked good. It had cheese and tortillas in it, which are two of my favorite things. I figured, why not try it? If it didn't turn out I have a dog who will eat most rejects. As I usually do, I changed a few things around in the recipe. As soon as it came out of the oven the first night I made it, I was in love! I only made a 8x8 dish, and it was gone in no time flat. Well, I didn't get enough of it because my family had to eat as well. Two nights later, I made it again, this time doubling the recipe. This was enough to feed the boys next door and our friend, Matt #2, as the seven year old calls him. We also had some leftovers!!! Sorry I don't have a picture to post. I'll get better about that. I think I'll make this again soon.
Tortilla Pie
Ingredients:
1 T Extra virgin olive oil
1/2 Chopped onion (more if you like a lot of onion)
1 1/2 lb Ground turkey (you can use ground beef if you want, but you really can't tell the difference)
2 T Garlic powder
1 1/2 T Chili powder
1 T Ground cumin
1 t Paprika
Salt and pepper, to taste
1 Can black beans, drained and rinsed
1 1/2 Cups cooked rice (you can use either white or brown)
Flour tortillas
3 Cups grated cheese (Cheddar, Mexican blend, whatever you want, and as much as you want)
Salsa - it's best if you use the recipe I gave you in a previous blog
**optional - 1 Can corn, drained
1 Diced jalapeno if you want to add a little spice (Thanks, Bobby!)
Preheat oven to 350.
Heat olive oil in skillet. Cook onions until translucent. Add ground turkey and spices. Cook turkey until browned. Mix in black beans and rice. You can also add a can of corn and jalapenos if you'd like. In an 8x8 baking dish add about 1/4 cup salsa. Top with a layer of tortillas. Add a layer of cheese and top that with half of the ground turkey mixture. Add another layer of salsa, tortillas, cheese, and turkey mixture. Finish with another layer of tortillas and cheese. Bake for 20-30 minutes until heated through. Serve with sour cream, chopped green onions, and guacamole. It's like a fiesta in your mouth!
Friday, August 21, 2009
Just a tip...
I just had to toss this out there for ya'll. While at HEB the other day, I was looking for breadcrumbs. I stumbled across TORTILLA CRUMBS!!!!! I had to snatch them up. While making my Chicken Cordon Azul tonight, I used them instead of the breadcrumbs. If you can find tortilla crumbs, get them, and use them. It's still good with breadcrumbs, but the tortilla crumbs made the chicken to die for. Trust me on this one. I guess you could make your own tortilla crumbs by putting corn tortillas in a food processor. I think it's just easier to buy them. So there was my PSA for the day.
I just had to!

The Kitchenaid mixer was calling my name. It does that sometimes. I had found a recipe on the Internet for these muffins that sounded really yummy. They are supposed to taste very similar to snickerdoodles...one of my favorite cookies. So, I tweaked a few things on the recipe and voila...yummy goodness in my mouth! I suggest you try these. My seven year old son said they were thumbs up. Both the batter and the muffins!
Snickerdoodle Muffins
Ingredients:
1 3/4 Cup sugar
1 T Cinnamon
2 Sticks unsalted butter, softened
2 t Vanilla
2 Large eggs
2 1/4 Cups flour
3/4 t Baking soda
3/4 t Baking powder
3/4 t Cream of tartar
1/2 t Salt
1 t Nutmeg
1 1/4 Cup Sour Cream
Preheat oven to 350. Grease a large muffin tin or use muffin liners.
Mix 1 cup of the sugar with the cinnamon in a small bowl and set aside. In another bowl, mix together the flour, baking soda, baking powder, cream of tartar, salt, and nutmeg. Now, if you have a Kitchenaid mixer, I suggest you use it. If you are one of the unlucky ones, you can mix by hand of use one of those nifty hand mixers. Cream together the butter and remaining sugar. Add the vanilla and eggs, mixing well. Add half the flour mixture to the mixing bowl, then add half the sour cream, continuing to mix. Add the rest of the flour and sour cream until mixed well. Don't forget to scrape the sides of the bowl! The mixture won't be very runny. Using an ice cream scoop, or just a spoon like I did, drop one scoop at a time in the bowl of cinnamon sugar. Roll around until coated and place in muffin tin. Repeat until all the batter is used. This makes 18-20 muffins. Bake at 350 for 20-22 minutes. Let your kids like the bowl clean. Enjoy!
Bleu or Azul.....
I've got some chicken thawing right now. I'm not too sure what I'm going to make using it tonight, but I've got a few ideas. The kids have already asked for "Mom's chicken strips". They are spoiled. I have two kids who refuse to eat chicken strips out of a bag. The kids can wait a few days for chicken strips. I don't feel like being splattered by hot grease tonight. I am thinking "Chicken Cordon Azul", my Mexican take on Chicken Cordon Bleu.
I guess I should also do some baking today. My husband loves it when I decide to bake in the middle of the day. Especially when the temperature outside is a cool 102, and the oven makes the house feel nice and toasty. The kids will be thrilled, though. That just means that they get to eat cookie dough. I am one of those moms who lets her kids eat raw dough. I ate it growing up, and never got sick from it. Well, maybe a stomach ache from eating two thirds of the bowl. I still scoop out a spoonful of dough and eat it along with the kids.
Chicken Cordon Azul
Ingredients:
4 Boneless, skinless chicken breasts
1 Stick of butter, melted
1 Package taco seasoning
1 1/2 cups Plain bread crumbs
1 Can peeled, whole green chiles (you can also use the diced ones)
6 Slices Monterrey jack or pepper jack cheese
Preheat oven to 350.
Pound the chicken breasts until they are 1/4 in thick, or all your pent up anger has dissipated. Add about 1/3 package taco seasoning to the melted butter and stir. Mix the rest of the taco seasoning into the breadcrumbs. In the middle of each chicken breast place a green chile and a slice of cheese. Roll up the chicken then dip it into the butter. When coated, roll the chicken in the breadcrumbs until coated. Repeat with the remaining chicken breasts. Grease a 9x9 glass baking dish and arrange the chicken in the dish seam side down. You can sprinkle any leftover breadcrumbs over the chicken and also pour the rest of the butter in the dish. Bake for 40 minutes. Take out of oven and place half a slice of cheese on top of each piece of chicken and bake for 5 more minutes or until cheese is melted.
Top with salsa (home made is the best!), sour cream, and guacamole. Serve with Spanish rice and black beans.
Thursday, August 20, 2009
Salsa
Salsa...it should be it's own food group. I won't buy the stuff they sell in the grocery store. Why buy it when I can make my own, and in my opinion, mine is so much better. I'm not cocky, that is just my opinion. So when any recipe calls for salsa, I'll just whip up a batch and use that. look in our fridge at any given time and you can usually find my salsa. It's super easy and cheap, too. You can also adjust it to your own taste. Just keep in mind that I really don't measure anything when it comes to making salsa. Make some today. You'll thank me later.
Ingredients:
1 large can whole peeled tomatoes, drained
1/2 - 3/4 onion, cut into chunks
1 - 2 cloves chopped garlic (I buy the minced garlic in a jar. I don't want my hands to scare away Edward the vampire.)
2 - 3 jalapenos, seeded and deveined
Cilantro, as much or as little as you like
Juice from 1 lime
Dump all the ingredients in a blender or food processor and give it a whirl. It's best served with Milagros tortilla chips. Store in the fridge.
Now, if you are going to have chips and salsa, you must also have guacamole. So I'll throw my recipe in for that as well.
Ingredients:
2-3 ripe avocados
Garlic salt
Salsa, made from scratch, of course
Juice from 1 lime
Peel the avocados and roughly chop them, saving one avocado pit. In a dish add the avocados, several spoonfuls of salsa, garlic salt to taste, and lime juice. Mash all together until it is a consistency you like. I like mine with very few chunks. Add more salsa and lime juice if needed. When storing in the fridge, drop the avocado pit in the guacamole. It will keep it from turning black.
Ingredients:
1 large can whole peeled tomatoes, drained
1/2 - 3/4 onion, cut into chunks
1 - 2 cloves chopped garlic (I buy the minced garlic in a jar. I don't want my hands to scare away Edward the vampire.)
2 - 3 jalapenos, seeded and deveined
Cilantro, as much or as little as you like
Juice from 1 lime
Dump all the ingredients in a blender or food processor and give it a whirl. It's best served with Milagros tortilla chips. Store in the fridge.
Now, if you are going to have chips and salsa, you must also have guacamole. So I'll throw my recipe in for that as well.
Ingredients:
2-3 ripe avocados
Garlic salt
Salsa, made from scratch, of course
Juice from 1 lime
Peel the avocados and roughly chop them, saving one avocado pit. In a dish add the avocados, several spoonfuls of salsa, garlic salt to taste, and lime juice. Mash all together until it is a consistency you like. I like mine with very few chunks. Add more salsa and lime juice if needed. When storing in the fridge, drop the avocado pit in the guacamole. It will keep it from turning black.
Here we go.....
I absolutely love to cook. Sometimes my kids won't eat what I cook, but I am OK with that. My husband usually eats what I've whipped up in the kitchen. The bachelors next door are always more than willing to have a bite or two. Thanks to my husband, I have fed more musicians than I can count. My daughter's friends want to spend the night just so they can have "Jenn's food". My son is picky, but he sure likes to turn on my Kitchenaid mixer and eat cookie dough.
My knives aren't as sharp as they should be and I don't always measure the ingredients or follow the recipe. My husband rolls his eyes when I tell him I just need to make a quick trip to the grocery store or Costco. I just tell him it's because we never know who is going to show up for dinner. We have an open door policy in our house. If you are a friend, and you are passing through town, then you ARE having dinner with us. No questions asked.
A friend suggested that I start this blog, so here it is! You will hear tales of my kitchen mishaps, endless shopping lists, and the results of my forays into the kitchen. I'll share recipes, too. I used to be stingy when it came to giving out a recipe, but then I decided that the rest of the world should be able to taste just a little of what comes out of my oven or bread machine. You get the point. Enjoy...but don't ask me to come do the dishes. I am still trying to get my husband to do mine.
Subscribe to:
Posts (Atom)