Tuesday, October 27, 2009

Cookie Cutters


I love cookie cutters. Especially the holiday ones. My collection isn't quite what I believe it should be, so I need to work on that. Ssshhhh...don't tell my husband! You can't have a holiday without making iced sugar cookies. Or at least that is what I think, and my kids feel the same way. Yesterday while I the kids were at school I made sugar cookies. And I iced them. By myself. I didn't just make the dough and let it chill until the kids got home so they could help. I didn't just bake the cookies and let them cool until the kids got home so they could ice them. I made the dough, baked the cookies, and iced them, all before the youngest kid got home from school. Now if you know anything about my kids, they love to ice cookies. They get pretty creative, and I will just leave it at that. I greeted them with "Mommy made sugar cookies today!" when they got home, wincing because I knew they were going to ask to ice them. To my shock, they were happy because they didn't have to wait for the icing to set for once. They just dove right in and promptly ate about half the cookies. I guess I'll be making them again later this week.


Sugar Cookies

1 c butter, softened
1 c sugar
1 egg
3 T milk
1 t vanilla
3 c flour
1 1/2 t baking powder
1/2 t salt

Cream the butter, sugar, and egg. Mix in the milk and vanilla. Sift together the flour, baking powder, and salt. Add this to the wet ingredients. Mix well, and chill for one hour. Roll out dough and cut out with your favorite cookie cutters. Bake at 400 for 5-8 minutes. This makes about 30 cookies, if your kids don't eat all the dough. What I really like about these sugar cookies is that they aren't overly sweet. That is what the icing is for!


Sugar Cookie Icing

1 c powdered sugar
2 t light corn syrup
1 T milk
1/4 t almond extract
assorted food coloring

Stir together the powdered sugar and milk until smooth. Add the corn syrup and almond extract, stirring until icing is smooth and glossy. Add a bit more corn syrup if needed to thin it out. Divide into separate bowl and add food coloring. Dip the cookies, or paint on icing with a brush. Let the icing set for about an hour.

Friday, October 23, 2009

Soup...

I love making soup. When it starts getting cool outside I immediately dig out my stack of soup recipes and start planning. Today was a soup kind of day. Several years ago when I first told my husband about this soup he was skeptical. There was no meat in it. So, at his suggestion, I added some chicken. Score! Ever since then I don't make it without chicken. Of course, being the bread lover that I am, I had to have bread with my soup. I could give up sweets before I would ever give up bread. I would never survive on a low carb diet! Dinner tonight was Santa Fe Squash soup and some crusty French bread. Yum!


Santa Fe Squash Soup

1 T olive oil
1/4 c chopped onion
1 can chicken broth
1 c milk
1 c sliced yellow squash
1 c sliced zucchini
1 c frozen corn
1 4 oz can diced green chiles
1/2 c Monterrey Jack cheese
1-2 cooked and shredded chicken breasts

In a large saucepan heat the oil over medium heat and cook the onion until soft. Add chicken broth, squash. zucchini, corn, and chiles. Bring to a boil. Cover, reduce heat, and cook until squash is tender. This takes about 15 minutes. Add milk, cheese, and chicken. Cook until heated through. I usually double this recipe. Top with more cheese and sliced avocado if you desire.


French Bread

1 1/4 c warm water
2 t sugar
1 t salt
3 1/2 c bread flour
1 package yeast
1 t olive oil
1 egg
1 T water

I used a bread machine today to mix this, but you can do it by hand, or use a stand mixer. Add the flour, sugar, salt, and yeast to the bread machine. Next, add the water and olive oil. Set the bread machine to the dough cycle. If mixing by hand, dissolve the yeast in the water. Stir in the olive oil. Add the remainder of the ingredients, mixing and kneading well. Form into a ball and let rise about an hour. Divide the dough into two equal parts. Form into two loaves. Place on a baking sheet that has been sprinkled with flour. Cover and let rise until doubled in size. Preheat oven to 375. Beat the egg and water together. Brush over the top of each loaf. With a sharp knife, cut three diagonal slits on the top of each loaf. Sprinkle with garlic salt. Bake for 25 minutes, or until golden brown. Try not to eat the bread all in one sitting!

Thursday, October 22, 2009

Breakfast...it's what's for dinner...if the kids are lucky


Remember those times as a kid when you were lucky enough to get breakfast for dinner? You only thought you were getting a real treat. Now that I am the mom, my kids get breakfast for dinner when I forget to thaw something out. Or I am just feeling really lazy. Either way, my kids are always happy when I suggest pancakes. They are happy to eat them in the morning, but are really happy to eat them for dinner. Any time I suggest pancakes, they ask me if it is going to be pancakes out of a box or "my" pancakes. That is the deciding factor for them. That and if they get to have chocolate chips or sprinkles in them. They drive a hard bargain. I made these pancakes so many times this past summer when my daughter was going to soccer camp. We had another soccer player staying with us for most of the week, and every morning they would inhale an entire batch of pancakes leaving nothing but the crumbs and dirty dishes in the sink. So I say "Go for it!". Have some pancakes for dinner and pretend that you are a kid again.


Buttermilk Pancakes

1 c flour
1 t sugar
1 t baking powder
1/2 t baking soda
1/4 t salt
1 c buttermilk
2 1/2 T milk
1 egg
1 1/2 T butter, melted and cooled

In a large bowl, combine the dry ingredients. I like to sift all mine together. In a separate bowl, mix together the buttermilk, egg, milk, and melted butter. Add the wet ingredients to the dry and mix together until just blended. It should be somewhat lumpy. You can also add chocolate chips or colored sprinkles if you want. I like to add frozen blueberries to mine. Lightly oil a griddle and heat over medium heat. Pour 1/4 - 1/2 cup batter into pan and cook on both sides until lightly browned.


It's not exactly gourmet...

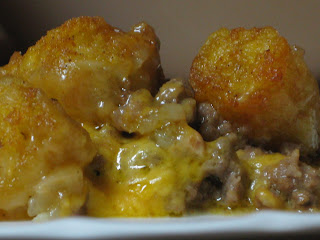
Comfort food. It's not exactly gourmet, but sometimes we just need a little comfort in our food. To me, comfort food needs cheese. This evening I retired to my kitchen and whipped up a batch of Tater Tot Casserole. I guess I could give it some fancy name, but this dish is anything but fancy. Which translates into "the kids will eat it". My husband will eat it. I will eat it. Looks like we have a winner! My husband saw me taking pictures and couldn't wait for me to finish. He knew that meant he just got to eat as soon as I was done.


Tater Tot Casserole

1 1/2 lbs lean ground beef or turkey
1 can cream of chicken soup
Chopped onion - as much or little as you like
Chopped green bell pepper - as much or as little as you like
2 cups grated cheddar cheese
1/2 bag frozen tater tots
Seasoning salt


Preheat oven to 375. In a pan on the stove, add the meat, onion, and bell pepper. Season with salt and pepper. Cook until done. Drain any grease from the meat. Mix the beef or turkey with the cream of chicken soup in a medium sized bowl. You can also add any veggies you want to this mixture. I threw in some grated cheese just because I'm such a fan of cheese. Pour this into a 8x8 casserole dish. Top the meat with the grated cheese, then add a layer of tater tots. Sprinkle seasoning salt on top of the tots. Bake for 35- 40 minutes. Enjoy!

Wednesday, October 21, 2009

When I want it, I make it...


I've been wanting chicken enchilada soup from Chili's. My husband didn't feel the need to take me there just to get a bowl of soup. "You know how to cook. Why don't you just make it yourself?" were his words. I informed him that it would involve a trip to the grocery store, hoping that would sway him, but that didn't seem to work. If you know my husband, he rolls his eyes every time I even mention needing to run to the H.E.B. to get "a few things". Off I went, list in hand, to the grocery store. What resulted was a soup that I loved. No more trips to a restaurant just to get soup. I can make it right at home, and I don't have to put on make-up or straighten my hair! Perfect, if you ask me. I threw all the ingredients into my crock pot this morning, and by late afternoon the house smelled fabulous. It was also super easy. Even a guy could make it.

Chicken Enchilada Soup

1 can black beans, drained and rinsed
1 can corn, drained
1 can diced tomatoes - use Ro-tel if you want some more spice
1/4 cup chopped onion
1 can enchilada sauce (10 oz), or 2 cups of the semi homemade, which follows
1 can cream of chicken soup
3/4 c milk
2 chicken breasts
2 t ground cumin

In a crock pot mix together the black beans, corn, diced tomatoes, and onion. In a medium sized bowl mix together the enchilada sauce, cream of chicken soup, and milk. I used enchilada sauce that I had made and frozen previously. Place chicken breasts on top of the mixture in the crock pot. Sprinkle cumin over the chicken. Pour the sauce over chicken and cook on low for 6-7 hours. Remove chicken, shred it, and add back to the soup, stirring to mix. Top with shredded cheese of your choice. You could also add chopped avocado or tortilla strips.

Enchilada sauce
This is the Pioneer Woman's version, I just changed it a little.
1 T vegetable oil
1 T flour
1 large can enchilada sauce
1 can chicken broth
dash of salt
dash of pepper

In a large saucepan, whisk together oil and flour to form a paste. Cook over medium for 1 minute. Add the remaining ingredients, stirring well. Bring to a boil, reduce heat and simmer for 30 minutes. This freezes really well.

Who doesn't love pizza?


Pizza. It's one of my favorite foods. I like to experiment with different toppings, but it always has to have tons of cheese. I love cheese. And you just can't beat cold pizza for breakfast. I hadn't made pizza in a while, so the other day I decided it had been too long, so out came the ingredients. I also made my own sauce this time. My son hates pizza sauce, and even he told me it was good! Guess I'll be making my own from now on. It was really easy, so I can't complain. I used to use my bread maker to make the dough, but I use the Kitchen Aid mixer with the dough hook now. I suppose you could do it the old school way with your hands, but I am just too in love with my stand mixer. Hope you enjoy the pizza as much as we do!


Pizza Crust

1 pkg yeast
1/2 t brown sugar
1 1/2 c warm water
1 t salt
2 T olive oil
3 1/3 c flour
Garlic salt - to taste

Dissolve yeast and brown sugar in water and let sit for 10 minutes. Stir in the salt and olive oil. You can also add some garlic salt or any other Italian seasonings if you'd like. I usually add several shakes of garlic salt. It adds a nice flavor. Mix in 2 1/2 cups of the flour. Continue adding the remainder of the flour until the dough is no longer sticky. Place into an oiled bowl, cover and let rise until doubled in size. This takes 1-2 hours. Punch down dough and form into a tight ball. Let the dough chill out and relax a minute. Roll out and let crust rise 15 minutes before baking.


Pizza Sauce

1 6 oz can tomato paste
1 c chicken broth (you can use water)
1/4 c olive oil
1/2 T dried oregano
1/2 T dried basil
2 cloves minced garlic
1 t sugar

Mix all the ingredients together, and you've got your pizza sauce. I made mine when I started the dough and just stuck it in the fridge until I was ready to use it. It makes enough for 2-3 pizzas.

To make the pizza, preheat the oven to 425. Bake the crust for 5 minutes before adding the toppings. Spread the pizza sauce on and add any toppings you want. Bake for 15 minutes, or until cheese is bubbly. I use a pizza stone. Which reminds me...I need to get another one.

Sunday, October 18, 2009

Black Bean Soup... Tasty!

It was cool out the other day. Quite a change from the 90 degrees we'd been experiencing. I thought it was fall?!?!? I guess Texas had other ideas. I was wanting some soup, but didn't really feel like going to the grocery store. My husband was really happy about that. I looked in the pantry and there were some black beans. Now, I am a big fan of black beans, but have never made black bean soup. I figured "no time like the present", so I gathered up the ingredients and off I went. Not that I had to go far... about 2 feet to my kitchen counter. I had searched the internet for recipes, and found several that looked good. Of course I just combined what I liked from each one and made my own. I was very happy with how it turned out. Even my husband ate some, and he is the type that thinks you should have some sort of meat at each meal. Honey, there was no meat in this, and you ate it anyways. I love my husband.


Black Bean Soup
3 cans of black beans
1 can Ro-tel
1 can chicken broth
Chopped onion - I used about 1/2 c, but you can use more or less
Minced garlic - to taste
Chili powder - to taste
Ground cumin - to taste
Splash of lime juice (optional)
1/2 - 3/4 c half and half
1 1/2 c shredded cheddar cheese
2 T flour


I used my crockpot for this because it had been feeling a little left out lately. Drain and rinse the black beans. In the crockpot add the black beans, can of Ro-tel, chicken broth, onion, and garlic. Stir and add a few shakes of ground cumin, chili powder, and a splash of lime juice. I just love lime juice, and think it adds a nice touch. If you like your food on the spicy side, throw in a few slices of jalapeno. Cook on low for 2 hours. When the 2 hours are up, puree the soup in small batches with the half and half. I used my food processor, but a blender will do the job. You could also use an immersion blender. I don't have one, but if my husband is reading this, maybe I will have one soon. Hint, hint. Return the soup to the crockpot. In a bowl mix the cheese with the flour. Add this to the soup, stir well, and heat through. Top the soup with sour cream, slices of avocado, tortilla chips, salsa, whatever strikes your fancy. You could also eat it plain, but there's no fun in that!

Friday, October 16, 2009

Baby apple pies

I love food that is bite sized and cute. If it's bite sized, then it doesn't have as many calories, right? Even if you eat a plate full of those little bite sized goodies. I like to think that way at least. I was bored today, so I did what I usually do when I am bored. I bake. If I am not baking, then I am scouring the internet for my next new recipe. The kids wanted something sweet, but I didn't feel like going to the store. I would have made cookies, but I was out of eggs. I ended up making these adorable little baby apple pies. They remind me of those fried pies I used to eat when I was younger and not worried about calories. Now, these little suckers aren't exactly diet food, but they aren't quite as bad as the goodness that I knew as fried pies. Well, unless you happen to eat all of them in one sitting. These are really easy to make, which is always a plus!


Baby Apple Pies

1 can refrigerated biscuit dough
1/4 c sugar
1 T cinnamon
2 apples (any kind) peeled and cut into small pieces
2 T butter, melted
1/2 c powdered sugar
1-2 T milk


Preheat the oven to 375. Mix the sugar and cinnamon together. Roll out each biscuit to about 4 inches in diameter. In the middle of the biscuit place about 1T of apple and sprinkle with some of the cinnamon sugar mixture. Drizzle a bit of the melted butter on top. Fold over the dough and crimp the edges with a fork to seal. Place on a greased cookie sheet and bake for 12-15 minutes. While the pies are baking, mix together the powdered sugar and milk until smooth, adding a bit more milk if necessary. After removing the pies from the oven, drizzle the glaze over them while they aer still warm. Enjoy! You might even share them if you have enough restraint.